Wednesday, May 3, 2023

Roundhouse N Scale Boxcars (Retro Release Review)

Some old Roundhouse 50' boxcars assembled and ready to go.

A few years back I was fortunate enough to buy the Roundhouse run of Sandersville 10,000 series boxcars, released back in 1997.  More recently, I bought a 'run' of Railbox boxcars from Costa Train Connection, who makes up runs of cars, which is just perfect when wanting to make rolling stock consists - with great service from this eBay vendor.

With my wife doing her Masters at night, I have a few hours to get stuff done on the MRR, so I thought I'd have a go - production line style - of getting these cars ready to run.

Out of the box, the cars come as a body shell, metal chassis, and wee baggy of trucks and couplers.

I weighed the entire contents of each kit as they would be on the track. Some were light given NMRA recommended practices, despite the metal chassis, so I got out my weights-for-adding-to-rolling-stock (split shot lead fishing sinkers) and added to the unassembled kits until the all components were at the right weight.

1.1 oz for 50' n scale rolling stock. I'm not a stickler but for me, cars just run better when weighted.

I sprayed the metal chassis matt black, let that dry, gave that a coat of Army Painter Anti-Shine varnish, and then assembled the trucks.

The metal frames/chassis came unpainted, so a splodge of matt black paint was needed.

Some of the trucks needed the couplers assembling which was, to say the least, very fiddly. But once everything was assembled and dry, I fitted the trucks to the chassis and then added the weights.

Weights superglued to the frame.

I've watched a few videos and read in blogs and mag articles on weighting rolling stock. All of them have said that adding weight over the trucks is best for flat framed rolling stock. An even distribution of weight, centrally,  is also crucial for smooth running and no 'lean', as is keeping the load low down - so the lead weights were unceremoniously smashed flat with a hammer.

At some point during the first assembly, I realised the brake wheel was separate and needed fixing to the shell. Happy with my recent purchase of super fine tweezers, with a dab of super glue, they were also attached.

Brake wheel assembly was easy with the right tool - my fingers are too big for N scale!

With that done, the body shells could be added and seven new boxcars were ready to run. The shells fit very snuggly so some gentle persuasion was needed with a thin flathead microscrewdriver to get them to sit right.

A bit of a milestone for the Sandersville & Tennille MRR, actual Sandersville rolling stock.

The Railbox cars were from a fallen flag Chesapeake and Ohio Railway (C & O) and CSXT, but I wanted reporting marks I've seen on more recent Youtube videos around Sandersville and Tennille.

Trovestar says the CSXT and C & O cars were released in 1979 and 1986 respectviely, so not the latest of releases 😆, but still look the part.

As part of the custom decals made recently, after a bit of research on rrpictures, I created some marks for various RBOX cars. I'm still waiting for the decals to be printed so will add them at a later date.

I'm pretty sure the boxcars aren't the exact right model, but they're 50 footers, which is good enough for me.

I know these are both old releases, but after weighting, they ran smoothly and now I actually have some Sandersville rolling stock.


Tuesday, April 25, 2023

Making Custom Decals


Decals made with Inkscape, for Sandersville's discontinued 50' foot boxcars.
At the beginning, I bought a whole lot of rolling stock without really knowing what I was getting or why. The ten Lifelike coal hoppers and six 50' boxcars, all of fallen flags long gone, are a prime example of this. In my defense, they were like $6 each (which in US and UK terms is roughly $3.70 and £3 respectively) - so why wouldn't you?

But as time has gone on, I've found out about reporting marks and 'periods' of US RRs and realised that none of the Lifelike stuff would be considered prototypical for this SAN/NS MRR (don't get me wrong, if I see something I like, I'll probably buy it anyway.... oh, look, shiny!)
Had some old gondolas of various fallen flags which are a very close match to a couple of NS series cars, so they'll get stripped and get new decals.
With a resale value of close to nothing (not worth the time listing them for sale) and because they run OK, and because I've already weighted the boxcars to NMRA standards, I decided to make up some decals.

What could possibly go wrong?
I loved the old Atlas 41665 hopper for ECC but couldn't find any others.
So, this was a slow dawning, not a flash of insight. For weeks I'd go searching for Sandersville rolling stock and decals, and watch videos of rolling stock around SAN and found there wasn't much in n scale on the market. Then I remembered I'd got some decals made up locally a few years back, for some wargames figures.
Researching the ECC leased hoppers using RRPictures turned up a different paint scheme for the hoppers, to the one Atlas made. Also, using the photos, even though ECC is gone and the cars have been roughly painted over, I realised there were quite a few cars leased to and painted for ECC.
I went for it and didn't stop at the old SAN boxcars. 

I made decals for ECC hoppers and ordered the same model so that 41665 won't feel so lonely on the track. I made up some RBOX stencils and some more recent paint schemes for a run of random hoppers purchased recently.
Using RRPictures again turned up some recent paint schemes for the random hoppers I 've just bought.
What I didn't account for was the hours and hours of measuring, remeasuring, studying the prototype, and remeasuring again. And the fudging of different fonts that has had to happen because I don't have the right railroad fonts.

For the cars I already had, I was able to better gauge the dimensions of certain lettering. Some cars I just couldn't get a clear view of what the lettering said and I have had to fudge this too.

Speaking of fudging, the 'D' on the Sandersville boxcars had a square stencil in the middle, so I had to decide on the paint colour for the cars (Tamiya Dull Red) and use the swatch from the Internet of this colour to 'stencil' out the 'D'.  Also, I couldn't make half a circle as per the ECC globe so have gone with a full circle that will have to be cut out during decaling.
Various RBOX stenciling I could find from photos.
The other thing that became apparent while researching the photos and car models, was that the Lifelike cars weren't to any particular prototype model, so accuracy was never going to be a thing. The same could be said for the Atlas hopper, as its not the hopper model leased by ECC.

I guess 'close enough' is good enough for me. If this works, I'll have strings of custom rolling stock for the Sandersville MRR. If it doesn't, I'll just redo the measurements and try again.

And with nearly a full A4 page of decals, they've been sent to the printer. He requires SVG files that Inkscape can produce and will then take my stuff and redo it so it prints properly - including the white.

In the meantime, I've stripped the rolling stock using Isopropyl Alcohol at 91% IA/9% water, with good results - after 45 minutes, most of the paint just came right off and leaving some overnight for the more stubborn paint, did no damage to the plastics whatsoever.

A couple of the cars after stripping.

I guess, watch this space...


Tuesday, April 11, 2023

Atlas Master: Kaolin Tank Cars

N scale Kaolin Tank Cars from the Atlas Master Range.

After getting back into the Sandersville/Tennile MRR recently, the realisation came crashing down that I only had three pieces of rolling stock for the Sandersville industries I intended to model (some older Atlas, 4 - bay hoppers in ECC livery). Having sold some music gear recently, I decided to do a round of rolling stock purchasing using the proceeds.

My period is circa 1996(ish), when I first read about the SAN RR, to the present(ish). That's as accurate(ish) as I get and my approach to keeping to the 'mostly prototypical' aspect of my MRR is to allow for rolling stock and locos across this period. But really, if its a kaolin car of some description, it'll probably make on to the MRR.

But there's been a lot of change even during this period. Kaolin companies have been merged and sold off, old businesses have stopped being serviced by SAN and new ones have replaced them.

Recent Releases: a trio of SHPX - nice and industrial looking

I always envisioned long strings of white and black kaolin tank cars in the yards and kaolin plants on the MRR and found Atlas had just released a refreshed range of their Masters tank cars with suitably 'industrial' liveries (i.e. leasing companies in mostly white and black).

Recent Releases: can't get more industrial looking than ACFX

So, I ordered a few... well more than a few... from Atlas USA and they arrived promptly within a few weeks.

Recent Releases: Thiele tank cars for the intended Thiele plant, with Sandersville on them (bonus!)

These things are excellent. The molded detail is just amazing and the tiny, tiny, lettering is crisp and perfect on all nine of the cars I ordered.

Recent Releases: the detail is crisp and some parts are fairly delicate (so detailed my camera grains-up when getting close).
Recent Releases: the lettering is insanely crisp and clear. The lettering on the left is .42mm high. The lettering on the right is even smaller and just as crisp.

As for the weight, I didn't realise the cars came weighted and had spent hours on Mr Google trying to figure out how to weight N scale tank cars without destroying them in the process. Now I find that they are weighted and slightly heavier than NMRA standards (most of mine were between 1.1 and 1.2 oz.) 

This is good thing, for me, as I hate railcar wobble. There is nothing that breaks my suspension of belief on a model railroad more than seeing cars wobble over points or uneven track.

Set up correctly, these tank cars will not be prone to wobbling or derailing when under the push - their weight makes them as heavy as most of the 50' boxcars and hoppers I've weighted to NMRA standards.

Out of the box, all ran oh-so-smoothly.

I know people have their favourite manufacturers and there is often debate on FB and forums about which is best, but I'm just happy to have received excellent rolling stock from Atlas that is truly ready-to-run.

Older Releases: GK tank cars will be right at home on the Sandersville MRR

But, after ordering new, I did some eBay searching to try and find some older kaolin tank cars and found a couple of 'runner packs' made up by Costa's Train Connection. I got excellent service from this vendor as there was an eBay glitch with a payment and he was patient and understanding - highly recommended.

Older Releases: Today, ECC is long gone but their leased cars will still make a welcome addition, as will the older SHPX car.

Today I received my assortment of older Atlas tanks cars. The lettering and detail is just as good on these older models, and there were various couplers including Rapidos and Accumates.

Older Releases: Not sure if Engelhard or Fairport cars ever make it to Sandersville, but they're kaolin tank cars which is good enough for me, as is the additional Thiele car.

Anyhoo, as 'operations' on this MRR revolve around semi-permanent consists of 3 - 4 cars, this is great progress for making SAN MRR look like SAN RR and is pretty much my planned fleet of tank cars done. Loving this hobby!


Friday, March 31, 2023

Hammerheads Need Love Too (#1 Painting NS C40-8s )

Paint refreshed locos with painted visibility stripes and handrails, a bit rough but better than the original

I guess like most of us beginners I try to find as much advice as possible before making a decision - and a big shout out to FB members of N scale groups that offer this freely and for the members of MRRM forums that I stalk that do the same.

So, using my 27 year old Bachmann Spectrum 'C40-8' locos on the intended DCC evolution that's occurring, raised quite a few questions as they are far from 'DCC Ready'. 

This included could they even be upgraded to DCC and, as their livery 'out-of-the-box' was state of the art in 1996, should I update their paint scheme?

After hours of research the answer to the first question was yes and I'll step through the upgrades in another post.

Updating the Paint Scheme

But having gotten the DCC upgrade question answered positively, with renewed enthusiasm I decided if I was spending the effort upgrading the locos to DCC, I might as well refresh the paint work to a more recent paint scheme. After 20 years of painting wargaming figures (my 'other' hobby) this was something I was much more confident in tackling.

Original paint work - looked 'plastic' to me and had bright silver highlights, with none of the cool visibility stripes and yellow handrails.
The visibility stripes are a bit thick but I'm happy overall with the end result.

So I went researching the prototype primarily using Railroad Picture Archives which is an excellent source of photos and the nsdash9.com roster for more guidance.

The first surprise was that, as numbered (8665, 8667, and 8671), the locos weren't C40-8s they were C39-8Es... wowser, I mean I can't tell the difference between the models at this scale, but I would have thought Bachmann would have at least got the designation right?

Anyhoo, I found the right locos and saw several paint schemes. I liked the last one, circa 2008, shortly before they were retired, with the solid white visibility stripe down each side and safety-yellow handrails.

I used what I had at hand which was some Vallejo (Cold White) and Citadel paints (Yriel yellow), masked the locos up, and got painting, touching up with a Vallejo matt Black.

Just painting black over the 'random' gloss silver surrounds of the windows and louvres, and horn and exhaust, vastly improved the look of the locos .
The masking was harder than expected as the tape had to sit in between the stanchions of the handrails, so needed some persuasion with an Xacto knife to mask around the stanchions properly.

This is when I realised that the model isn't quite the same as the prototype and that the stanchions actually come down the body further than the prototype - so my first major call was where to actually put the edge of the white stripe (I think I've made my stripes too thick).

Getting the hard edge lines for the white stripes (7 nation army echoes) took many goes touching up with both white and black, and are still a bit rough close up, but look good enough at 'track distance'.

I sprayed the petrol tank first with matt varnish so the paint would have something to adhere to, as this was slightly different plastic to the body with a satin finish. In the prototype pics they look like they're painted dark grey (even with weathering), but I decided to stay with black and then gave them another spray of varnish.

At present, I can't bring myself to dismantle or paint the trucks for fear of clogging up the drive system or stuffing up the reassembly, but I guess I'll get confident in that soon too. As for weathering, if I do one loco or piece of rolling stock, I'll want to do all of them... so, that's a project in itself, for another time.

To finish, I masked the windows so the plastic glass wouldn't craze and the locos got several light sprays of Army Painter's matt varnish.

Finished locos pictured with the new kaolin cars from Atlas which I'll cover in another post.
Will also update couplers at some point during the DCC upgrades.

Tip for painting 'soft plastic' handrails

Unlike the body, the handrails are, what we call in the wargmes scene, 'soft plastic'. This means any paint you put on will flake off at some stage. For wargames figures, especially 1/72 scale figures, the plastic seems to produce an oil across the surface which gives the plastic a slightly glossy finish. This film also means the paint won't adhere properly to the plastic, hence it flakes off. 

So, here's a wargaming tip I was taught years ago when using acrylic paints. Paint a carefully applied layer of PVA glue completely over the plastic first, then paint over this rather than onto the plastic. Then apply another layer of PVA glue over the top of the paint.

This sandwiches the paint between two skins of PVA and it is unlikely to flake for many years (I've had Carthaginian 'bendy, soft plastic' spears that have only just been redone after 20 years). 

The PVA glue dries clear but gloss, and do take care not to leave 'globs' of glue around angles. Too many coats of PVA and the 'clearness' will turn opaque, so its good to get a complete top layer on in the first round.

Also, I've found it takes better if the top coat of PVA goes past the edges of the painting, I think because the glue adheres again to the plastic, making a complete seal.

Next up, I've just received a shipment from Atlas of their 'new' Master kaolin tank cars, so better have a look at them.


Wednesday, March 22, 2023

Googling the Prototype to Mock Up Sandersville/Tennille


Mock up of industries I want to model on SAN MRR.

I live 14,000 kilometers away from the prototype I've chosen to model. I'm not sure I'll ever be able to see it in person and I don't know a lot about North American rail. Sure, I could have chosen to model something closer to home but I love the NA locos, rolling stock and industries. 

But Google Maps can provide an eye-watering overview of the prototype and a virtual drive through the countryside (in my case of Georgia) via Road Side View - providing detail of industries and rolling stock on both SAN and NS RRs.

So, for those who haven't done this sort of thing, I thought I'd share how I mocked up the Sandersville/Tennille MRR using Microsoft Snip & Sketch, PowerPoint, and the free version of SCARM - without spending a dollar.

Photos © Google Maps.

Mocking Up Before Touching Any Track


Things progressed rapidly with planning once I lost the double loops and relaxed the main out into the temporary wings of the layout (as per previous post).

In my mind, there were always 'must have' things that I wanted on the railroad, but I've realised I can't have everything and had to make some sacrifices along the way. When it came to the crunch, I was surprised at what 'I couldn't live without'. For instance the switcher track and NS office at Tennille made it on the list.
Track where switcher rests between cutting cars and servicing Railcar Industries and old station/NS freight yard building.

But as the baseboard stands at the moment, I can only really model the South Side of SAN and not the North Side, which runs miles past SAN HQ. This includes the model railroad iconic Tybee Street, with SAN running down the middle of it.

I also knew I wanted pipeline-fed and powder kaolin plants and settled on a Thiele plant and mix of a Kentucky-Tennessee and IMERYS plant. Both Beasley (wood products) and Fulghum Fibers (woodchips) will make for interesting rolling stock and great models, so they were added. The same could be said for Bulk Chemical Services, the granary, and the bulk transfer. So they were also added, along with the Sandersville main office and sheds.

Out on the main, with a bit of space to spare, I realised that adding a scaled down American Railcar Industries would make for some more interesting rolling stock for mainline trains, for some added switching operations, and a pseudo-staging/rest area for tank cars and hoppers (which Railcar services). So that was added in the design - whether or not it gets done before I have to move again is another thing entirely.

Not really knowing too much about these industries, especially how big they'd be on an N scale layout, I've used Google Maps to start the planning process.

First, I set SCARM up with a 10 centimeter grid and got building. Then used the MS Snip & Sketch tool to place various components of the SCARM layout into PowerPoint. As I'm using the free version of SCARM, there's a limited number track objects you can use per layout, so I ended up with several partial versions in SCARM which I patched together in PowerPoint.
Several versions of various areas of the layout in SCARM due to track object number limitations in the awesome free version.

Then I went on Google Maps to get pictures of the industries themselves and using something I know the measurement of (a 50' hopper), I produced a scale (having converted to meters being in a metric country).
I used a string of 50' hoppers to build a rough scale - not completely accurate but close enough for mocking up.

For each industry, I then applied the true scale and converted to N scale by dividing by 160, to get the sizes of various buildings and landmarks in meters, and then adjusted for centimeters.
Using the scale to see how big Fulghum's wood piles are. At  approx. 90 meters diameter in real life, that's 56.25cms in N scale.

Once the scaling was set, the industries only took a few hours to mock up into the design, going backwards and forwards between SCARM and PowerPoint. Then I added an approximation of roads to service the industries and a scene break (some foliage) to the design to separate SAN from NS, using rectangles and making the objects transparent.

Using the Transparency tool for PP objects helps to better visualise areas of the mock up.

I'd also made the decision that any switches within reach of the operating hole in the center would be manual; hands on switching is the name of the game for me - as is switching 3 - 4 cars of consists at a time, so track length on the industries is also important. 

So I measured the reach of my right arm and made 'reach templates' in PowerPoint to ensure turnouts would be in reach. I also allowed for the length of four 50' cars on sidings that needed them.
I needed to be sure any manual switches would be in reach. The yellow shaded areas are how far I can reasonably reach across the layout to manually activate a switch (I could reach further but this reach is about a hand-length back so isn't a 'stretch').  

Its a pretty rough mock up but enough to get going and although there is a track design here per se, this will not be the final track design for the industry areas. 

The Sandersville and Tennille yards are finalised, as is the slim staging area at the back. I've spent hours reading about yard design and watching yard design videos, and these track setups have all been through about 5 iterations themselves, so I'm happy with them.

But after the initial track laying experience (which I'm not great at) and now a couple of hours of replacing sidings and turnouts in SCARM, based on the position of minimum radius curves (14" - 15" minimums) and set tracks, this is, at best, a close approximation of where the industry tracks will lie - I know things will change again when I take to laying track and building structures.

Mocking Up - Thumbs Up

Virtually mocking up has been fun and informative exercise.

I've spent no money but now know:
- how big industries can/need to be on the layout
- where industries can go following the prototype and available space,
- that I can reach the manual turnouts needed,
- that there is enough track length for the car consists that will be switched,
- the possible number and mix of turnouts.

Mocking up this way has helped me better visualise the layout and start the planning of the kit-bashing/scratch-building industry builds needed for this  - something I've been wanting to do for almost 30 years and now I can finally look forward to the challenges this layout will bring.

As an aside, stalking.... I mean researching the prototype using Google especially with road view, yields many unexpected bonuses in terms of research.

For instance, a few years a go, I found these to the East of Tennille, off of NS track No. 1, which could make for some interesting traffic in the future.
Found some snaps of Georgia Midland Railway locos by following the NS track East of Tennille using the road view in Google Maps.

During this round of research I also found most of the Sandersville motive fleet resting in the mid-day sun at the Sandersville RR complex. A scene that would be found on many model railroads, represented in the prototype.

But then I spotted what looks like a small NS switcher resting there as well.
Awesome to see the loco fleet at SAN HQ, but what is this NS switcher doing there and what model is it?


Thursday, March 16, 2023

It Lives... Again - From DC to DCC

A mock up of the new layout using SCARM and PowerPoint.

Its been two years since I did anything on the Sandersville/Tennille layout. Life it seems had other plans, with 3 moves in this time caused by legislative changes to home owning and banks reacting, resulting in a totally messed up rental market and moving target for mortgage deposits. But with this latest move came a garage which will be used for storage and (now) for the MRR.

So, realising it'll be another temporary set up, it got me thinking and some large changes are in store.

More confusing than algebra. My DC and blocks are going. 

I looked at my carefully crafted blocks of DC awesomeness and the Atlas controllers that controlled just a couple of simple loops and couldn't remember what switch did what. If I'm having this problem now, I can't imagine what it will be like with the full layout. 

Cab control seemed like the way to go when I started, but it all seems too complicated and 'clever' and its being ditched for DCC (I did make a printed template letting me know what switch does what, but still...). I've made this decision while most track is temporary or easily 're-blocked' and after hours of research, will be going with a Digitrax system.

The double loops were fun... for about five minutes. 

Next, while it seemed like the most awesome thing to do, the double loops are also going. I'm liking the idea of remotely realistic operations and the inner loop is meant to be the AD track for Tennille. Also, a train could make it around the loop in less than a minute.

So, the loop ends are going and some temporary wings will be added to stretch out the main line. Once we move to a house we own, the temporary wings can be replaced/modified as space allows to extend the main loop as long as it needs. If I get my head around DCC, the loop will probably turn into a point-to-point representing Macon and Savannah.

But with some new locos, custom decals, and rolling stock ordered (subjects for a different post), its a matter of waiting till we move and starting the new and improved Sandersville/Tennille.


Friday, February 19, 2021

From Design to Working Track #1

We finally have two Cab Controlled working loops which have adhered to the guideline 'using what we already have' - and used a score of other parts we didn't.

For a beginner, I can only say the journey from design to track laying has been as much of a learning curve as creating the baseboard and design was.

Turns out, translating the design on to the baseboard is yet another, different, skill, requiring a great deal of patience and planning, and limited by some immoveable - seemingly obvious - practical constraints. For instance:

  • fixed curves take up a fixed space
  • a double track crossover ties those two tracks together and influences the spacing of everything attached to it - like a double loop
  • placement of turnouts, especially when powered, is dependent on the construction of the baseboard
  • available cash

As obvious as these constraints were, most of them weren't obvious to me as a beginner until I took to the board with track and track pins in hand.

Phases and Stages

Naively, in retrospect, I had laid out several phases to complete the Norfolk Southern loops and yards, and Sandersville itself. My 'slice of fried gold' went like this:

  • Phase 1: lay the double loops with crossovers, the Tennille/Sandersville interchange yard, and the RailInc. passing sidings/yard
  • Phase 2: lay Sandersville
  • Phase 3: have a cuppa
  • Phase 4: play with trains
Reality, it seems, is a harsh mistress.

I looked at what we had:
  • some left over flexitrack 
  • the E-Z track curves for the loops
  • some 3 amp wire
  • one SL - 395 medium turnout
I looked at the plan and realised, just to get the two outside loops going we still needed:
  • trackbed
  • six more turnouts
  • more flexitrack
  • track pins
  • rail joiners (insulated and standard)
  • a new soldering iron
  • switches for Cab Control
  • track cutters
  • incline starters and risers
  • some 3mm MDF for the raised section and to help raise the flexitrack to the level of the E-Z track (which stands about 5mm above the baseboard)
Reality rained down.
It soon occurred to me that I would have to stage the phases.

There are hundreds of dollars to commit in each phase and even this plan hid the practical aspects of model railroading.

Laying Tennille Norfolk Southern Main and A/D Track - Or Phase One, Stage One

Primarily, because of the investment needed in just getting the loops going, I decided to do the 'front part' of the loop and make the investment in the Tennille - Sandersville interchange, main line and A/D track.  So the phase was further broken down into stages:
  • Stage 1: lay the front part and temporary track for two loops
  • Stage 2: install powered turnouts for the crossovers
  • Stage 3: lay the curve inclines and track and raise the back, laying temporary track
  • Stage 4: lay the RailInc. yard
  • Stage 5: lay the Tennille-Sandersville interchange yard
I realise this means having to re-lay the crossovers once the motors are purchased, but with the curves only 'pinned' in place, I can dismantle them to provide easy access to the crossovers at each end.

Finished 'ends' of the NS Tennille-Sandersville interchange, main and A/D track

To Twistlock or Not to Twistlock

Over a short period, I purchased the required kit and also decided that the crossovers would be powered, controlled by one switch each, so as to avoid crossover catastrophes - both turnouts would fire at the same time ensuring a through path would always be available.

I looked around at turnout motors, which all seemed like a lot of work, and then randomly found the Peco PL-1000 Twistlock Turnout Motor. Before purchasing, I Youtubed installing the twistlock because, frankly, it seemed too good to be true.

I watched the sales video from Peco and then watched the bloke from Aber Halt Junction actually installing the motor and decided it was a go.

I approached the baseboard with something like trepidation, prepared to lay track, so much planning had all lead to this point in time and... realised two of the Twistlocks would be over baseboard supports...

This threw me for a few days as I mocked and re-mocked up the curves and turnouts.

Technically, the plan hadn't changed, but its placement on the board had, because of the placement needed to fit the turnout motors.

I decided that I would need to install at least one Twistlock before laying the straights, to get everything in a position where it would work - this included thinking about the RailInc. (rear) yard turnouts and the space needed for them, which had been shunted sideways along with everything else attached to the loops. 

Fortunately, the local train shop guy at Iron Horse Hobbies instilled me with some regained confidence when he said that he'd used the PL-1000, that it was as easy as the Aber Halt Junction video and that he wouldn't be using anything else for turnout motors from now on.

I got home and approached the baseboard with even greater trepidation - had I got it right this time?

I laid the MDF and trackbed, waited for it to dry, positioned and repositioned the Twistlock motor template, then repositioned it again, raised the drill and...

...it was a really simple, easy, installation. A very good product that even a complete beginner like me can install - and I mounted it 'to the left' (reversing the template) to save space as the instructions offer. 

Peco PL-1000, Twistlock in place - seriously, if I can do it, anyone can

With the initial placement of the loop finalised I set about laying track - finally.

Transitioning to/from E-Z Track

Having played around with test tracks and having polled the forums, I realised the Bachmann E-Z track sits quite high above the baseboard - approx. 5 - 6 mm. I needed to come up with a way of transitioning into flexitrack and peco turnouts from E-Z track.

At first I was just going to slice the connectors off the E-Z and use 1mm - 2mm shims to gently transition to the 3mm Woodland Scenics trackbed, as the forum guys seemed to indicate was the thing to do. But I decided that in the future, I may want to sell the E-Z track and slicing off the connectors would make it worthless.

I also had to take into account one of the guidelines for the layout, it had to be taken down and stored on its side in the garage. I decided that I'd make little dioramas using 3mm MDF as a base, that could be taken off the layout for storage. Track and 'flat terrain' (like grass) would stay in place but things like structures will be removed. As such, the non-E-Z track could be raised up without looking weird (because the surroundings would be raised about 3mm and the track would sit at about 6mm) and without slicing into the E-Z track.

So I went for forming the track bed around the connectors and some amateur attempts with a chisel have done the job. 

First I drew around the connectors to form a template, taped the paper template down on the MDF (aka trackbed base), and chiseled away the unwanted MDF.

The transitions have worked well, although the MDF was variable in its thickness it turns out- one end was 4mm.

Now I can shape the bed once other yard track is in place and ready to be ballasted.

Mocking Up and Short Straights

I'm not sure how many times I mocked up the crossovers and turnout areas, but its really paid off. The final configuration of turnouts and short straight 'fillers' from Atlas 2509 Snap track Assortment, while it adheres to the planned design, is different to the plan and takes into account the many physical constraints encountered above.

I highly recommend beginners have a couple of sets of short straights at hand at all times for those situations where you go 'oh dear, that's not going to fit'.

In my case this was having to shorten the side straights in the fixed curves using 1.125'' rather than 2.25'' sections, included in Bachmann Assorted Straight Short Sections (N Scale) 44829, because the 'Twistlock incident'.

After that, I realised that fixed parallel curves act in a certain way and that, using the Peco N 6 foot gauge as a minimum, I could in fact make the straights in the inside curves slightly longer than the outside without risking rolling stock and locos of passing trains, side swiping each other on the curves.

I also admit to caving in to the amateur 'cram as much track into the loops as feasibly possible' trick, but mocking up and short straights have made this possible.

Carving Up Your Precious Track - Using Peco Streamline Turnouts

During mocking up, I also realised that working with Peco Streamline turnouts means having to carve up track to make it fit.

For experienced railroaders I guess its nothing new, but to a beginner, I nearly had a heart attack when I realised I had to cut into the plastic ties!

But polling the forums via Mr Google confirmed that it is indeed what's needed. You have to slice away ties to make track fit around Streamline turnouts. Followed by even better advice, if at all possible, do not slice into the ties on the turnouts (for fear of the TOs going out of gauge), use straight sections of track and slice into them.

The red circles show where the trims were made on the straight (blue) track and I avoided trimming back past the little false-nails-clippy-thingies that hold the track in gauge, so that the track held in gauge.

Electrics

I am the destroyer of soldering irons.

About twenty years ago, to clean my soldering iron, I filed the tip and kept on using it. The resulting bright orange glow that developed from the tip and the iron was alarming.

More recently I totalled the tip on my new iron by wiping it on a sponge, without first wetting the sponge. Its totalled. Blackened, pitted, an ex-tip.

I suck at soldering. I think I did two reasonable solders before killing the tip... its gone, its shuffled off 'is mortal coil, run down the curtain and joined the bleedin' choir invisible.

But, and some would say its a big one, I persevered and soldered up all loop blocks without melting the ties or forcing the track out of gauge, or burning the house down.

Common rail wiring bus

Earlier in the the game I had added a new guideline to the list of guidelines for the railroad, minimal soldering and simple electronics. 

Following the 'using what I had' guideline entailed using the two analogue controllers.

I'd decided on Cab Control and isolated sections during design, then adding the new guideline, I decided on Common Rail wiring and Atlas #215 Selectors to reduce the amount of wiring and soldering or "Keep it Simple Stupid".

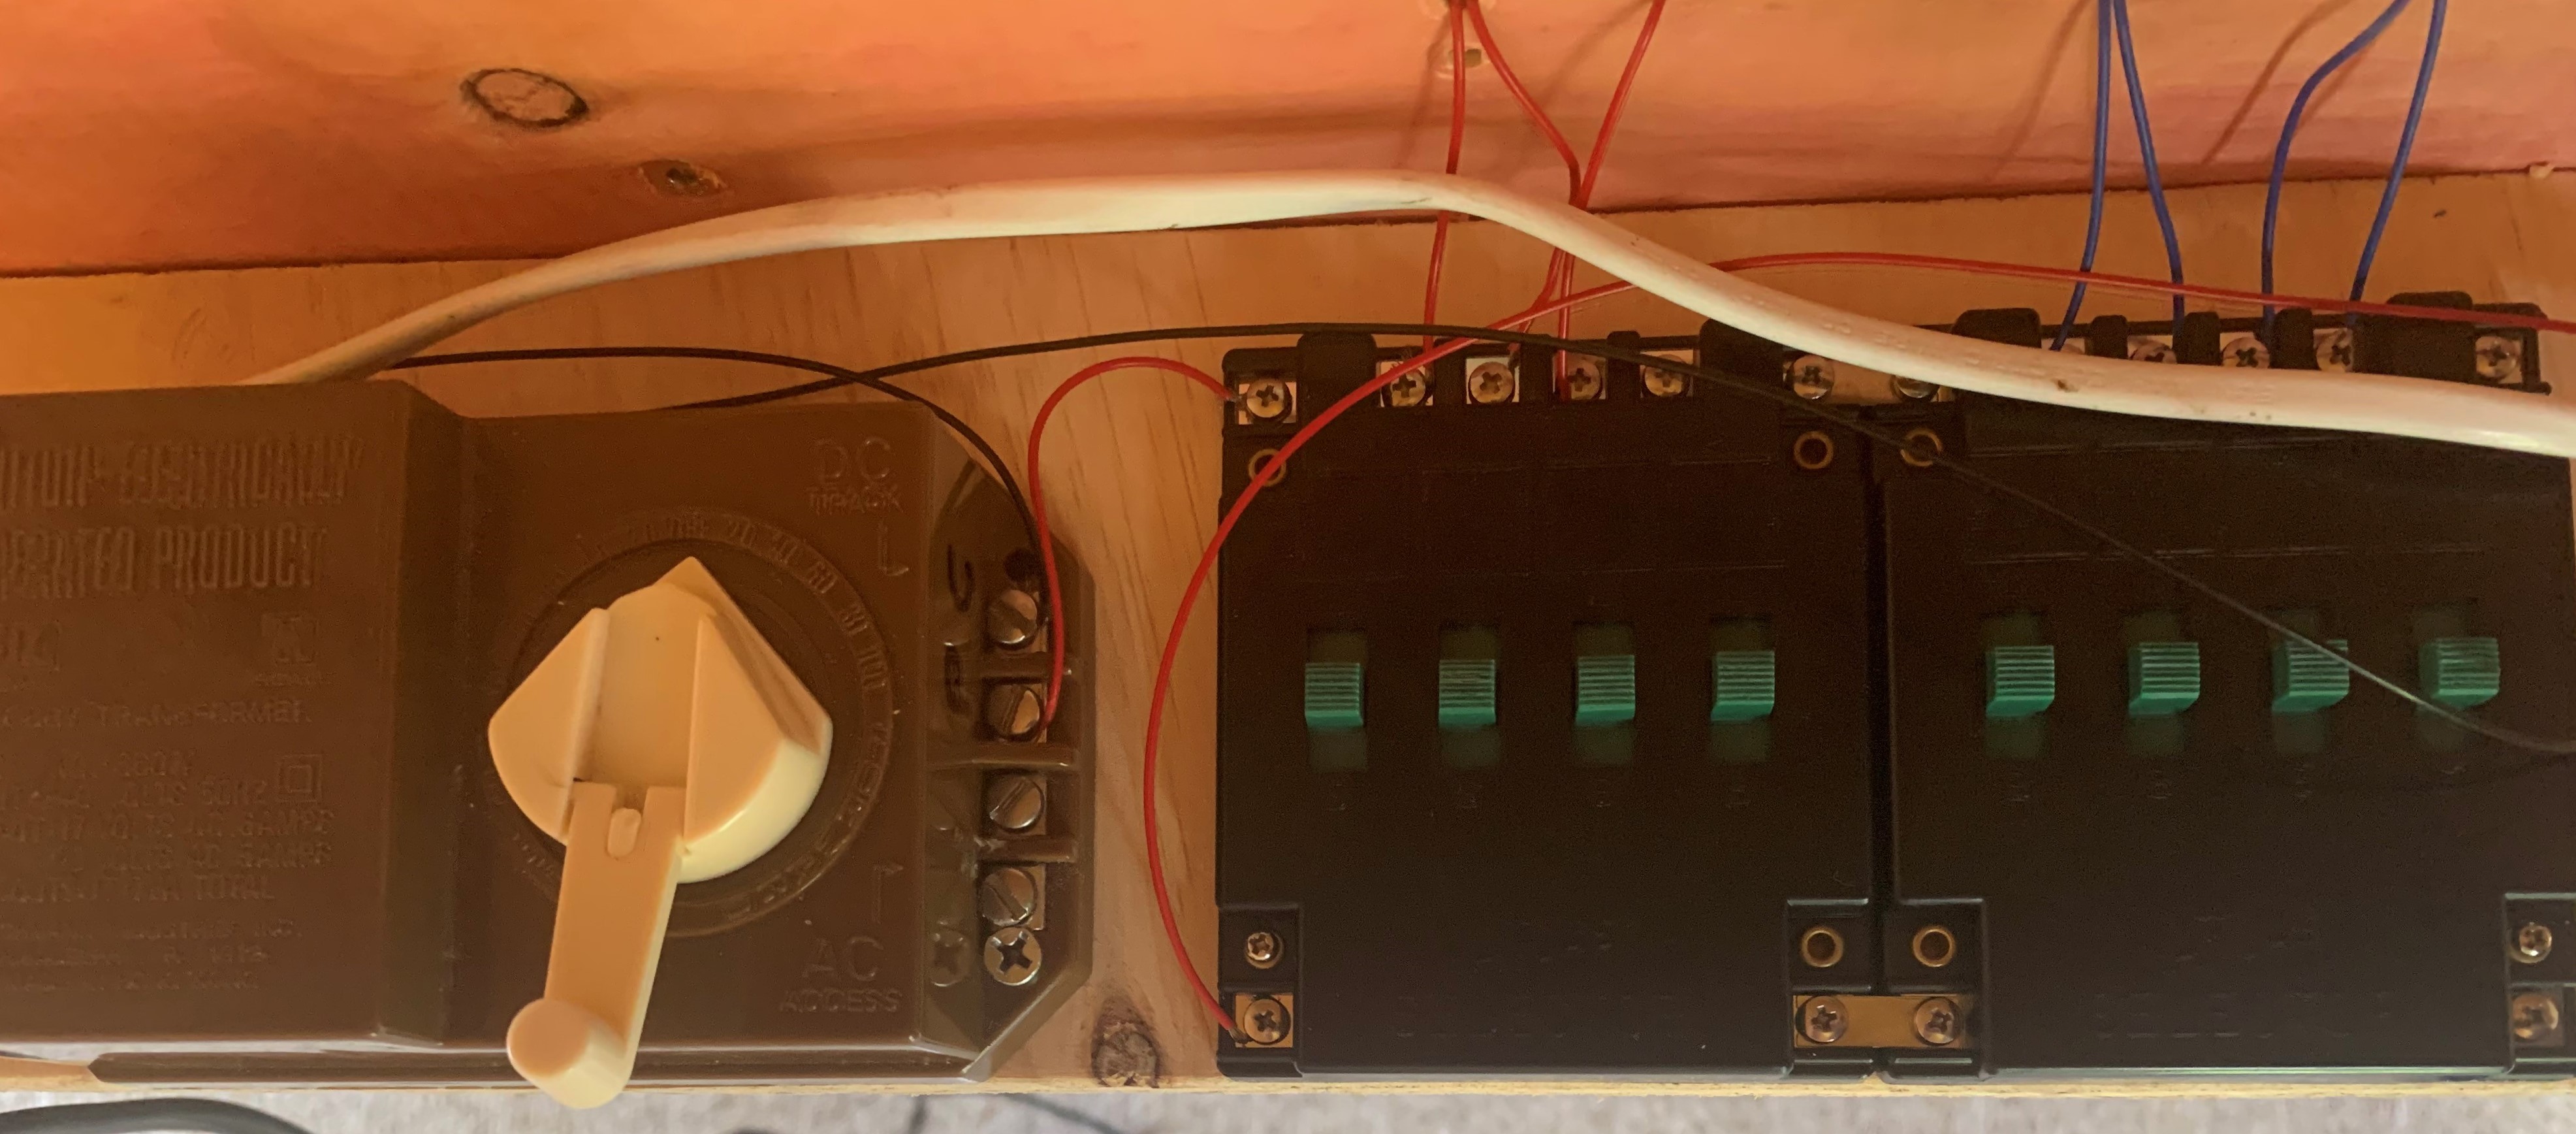
Atlas Selectors made it quick and easy to get Cab Control going - have yet to purchase clips to tidy the wiring

Using KISS as a guideline, I connected up the common wires to a common rail bus, connected some to the track and connected the 'powered' wires for each block, turned everything on, flicked some switches and hey presto, dual cab, block control.  

Trains seemed to lose juice on one section but that was as easy to fix as adding a wire to the common rail bus and the section, and hey presto again, juice fixed.

Tripping the Double Loop Fantastic

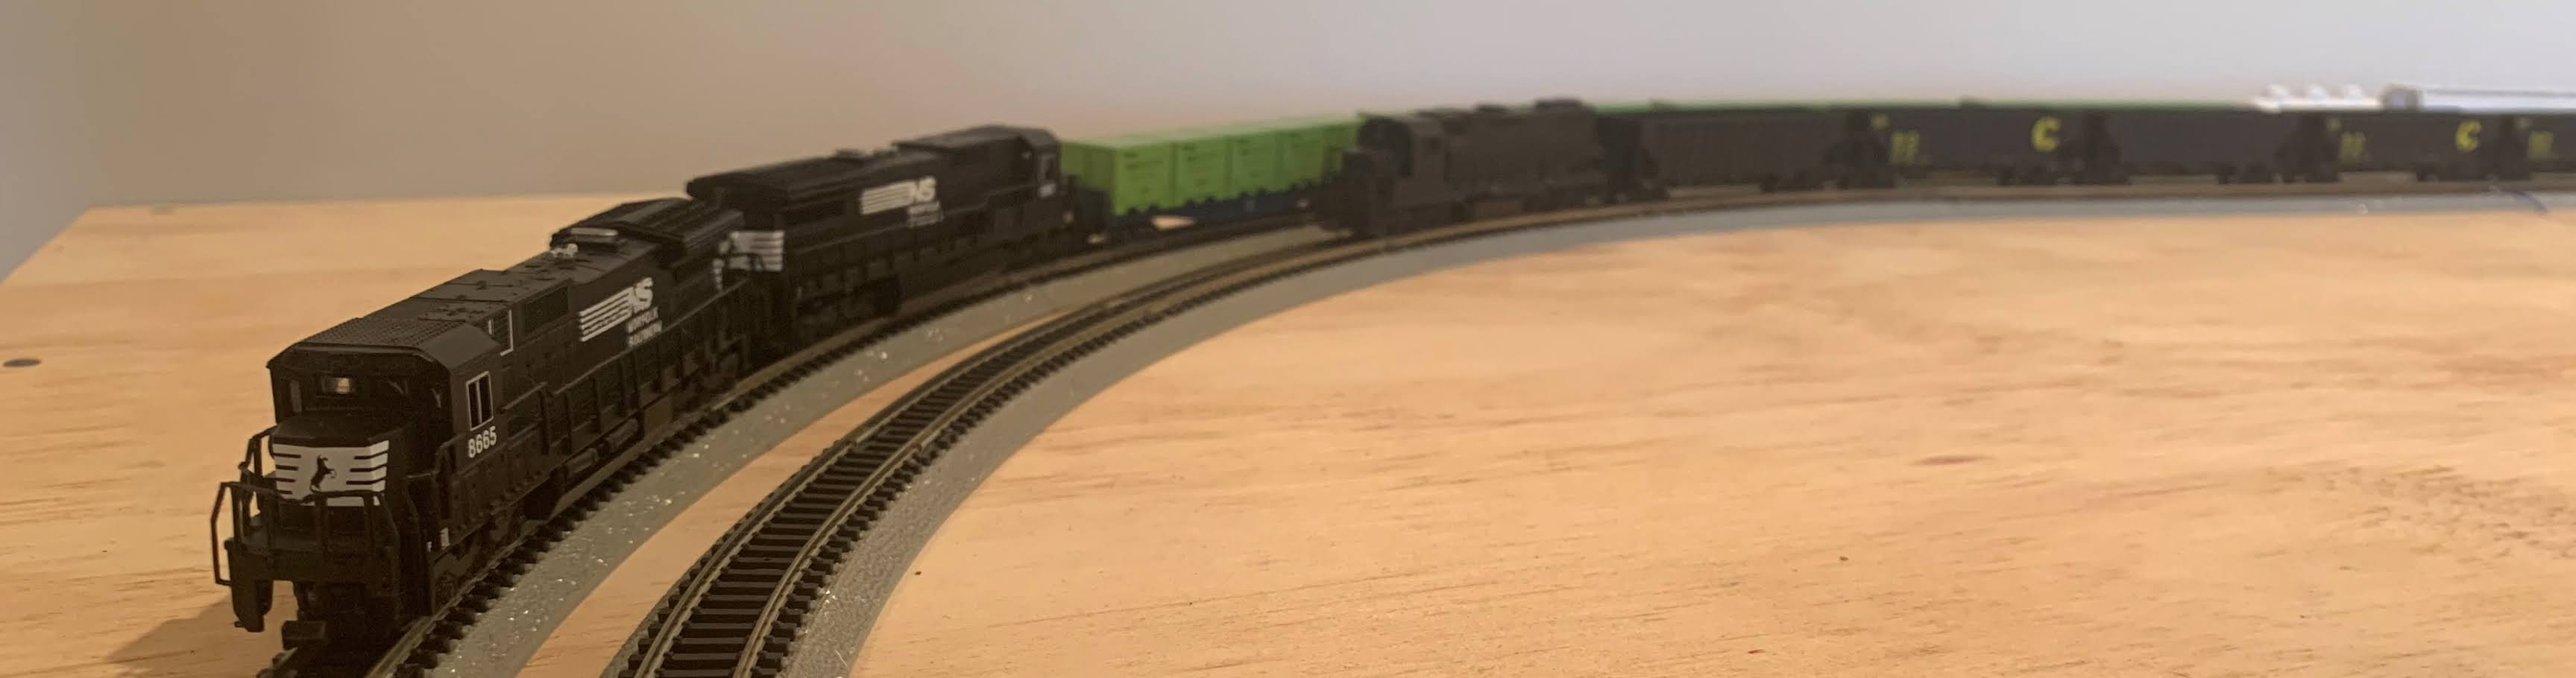
Although we are a long way off from 'permanently' finishing the Norfolk Southern portion of the railroad with anything like prototype operations, and although its been twenty years since I first dreamed of running two locos on the same track, we now have two operational loops.

But its been worth it. When my step-son saw two trains going around the loops, there was a genuine 'this is so cool!', followed the next day, when he got home from school and asked "Can I play with the trains?"

You know what little buddy, yes, you can finally play with the trains.

Job done.


Roundhouse N Scale Boxcars (Retro Release Review)

Some old Roundhouse 50' boxcars assem bled and ready to go. A few years back I was fortunate enough to buy the Roundhouse run of Sanders...